Pages

Friday, November 30, 2012

3 Tips To Be Clutter Free This Winter


I'd like to welcome Anna Hicks who has written an article especially for DIYbyDesign.

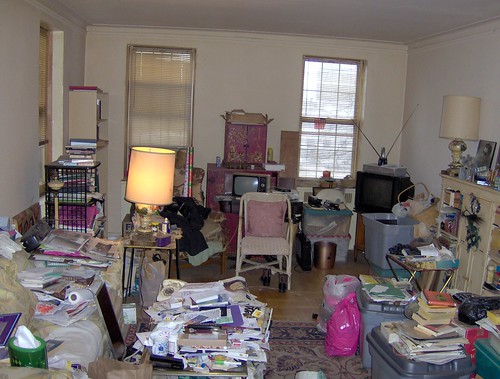
Clutter seems to just build up in most people’s homes, especially busy people with children, and the holidays make everything far more hectic than usual. One day your house is neat and clean – the next, you’re wondering how things got so messy and why everything looks out of place. You’re not alone. While managing clutter at home requires regular effort, it really isn’t that hard, and once you know how to clear the clutter this winter, the process will be much faster and simpler.
Home Office Project -- Office 3 --02.29.2008

Grab a Box
When you start to notice clutter piling up and things totally out of place, the first you should do is find an empty cardboard or plastic storage box. Start in one room and grab everything that is out of place and put it in the box. Once you’ve got everything, put it back where it belongs, even if it isn’t in the same room. 
Take it one item at a time. If it’s something you don’t really need, put it in the trash or in a separate box for a garage sale or donation. You should always have a garage sale or donation box in your garage, attic or basement, or even as a clever gift for Christmas! 
Additionally, you can use the earnings you get to buy newer, nicer things to your home, like some decorations from FlagsOnaStick.com. Repeat the process with the box in each room of your home until everything is where it belongs. You’ll need to do this about once per week – try to stick to a schedule.

A cluttered apartment
Don’t Be Afraid to Multitask
Multi-tasking can generally make it hard to get a task done for many people, especially busy parents with kids running around cooped up from the snow, but when it comes to clearing the clutter in your home, you may have no choice. Chances are the only time you have to clean is when the rest of your family is at home, and if you have kids, they’ll likely be taking up at least a bit of your attention. 
That’s okay when it comes to clearing clutter, though. Pick up out of place items in the family room while you’re watching television with your kids or straighten up the kitchen while you’re making them lunch. It might be the only way to maintain a clutter-free home.

Storage filled with Picture Books
Storage
If you’re like many people, you might just have too much stuff for your home. Get rid of what you don’t need; Christmastime is a great time to do this. Have your kids help you with preparing a care package of all their old clothes and clutter to give to someone who can really use it. Someone always can. 
Even if you get rid of what you don’t need, you’ll probably have items that you really want to keep but just don’t fit in your home. Self storage units are a great way to keep important items safe without having them become clutter in your home. Self storage units come in many different sizes, are very affordable and might just be the answer to your clutter problem. 
This holiday season, don't wait until the ball drops to decide to clean your house - get your family involved or just grab a box and start making your house the cleanest it has been in a long time. 

Thanks Anna for these awesome tips.

-Judy

Thursday, November 29, 2012

Christmas Mantel 2012 and The Nativity

Last night my kids sports activities were cancelled unexpectedly, so we found ourselves free for an entire evening.  We used our time well and started to decorate for Christmas.  The tree will have to wait for the weekend, but we decorated the mantel and took out some other decorations including the nativity.  I'll be sharing more of our Christmas decor over the coming days. 

It's tough to get a good shot of it with the lights out.


Here is our nativity.  My husband bought this for me as a gift when we first were married.
It's still one of my favorite things.

It's beginning to look and feel like Christmas now.

How about you - have you started decorating for the holidays yet?

-Judy
Pin It

Wednesday, November 28, 2012

Fall into Fall - It's a Party #93

Welcome to this week's Fall into Fall party.  Before we get started on the party I wanted to catch you up on what's been going this week at DIYbyDesign, in case you missed it.
I transformed this end table that we inherited.  Come check out the step by step.
I also finished organizing the new basement closet space.  
This was a previously unfinished, kinda gross closet.

Now onto the party.  Last week's party was filled with tons of inspiration and great ideas.  Here are this week's features:

HOME DECOR:
Fancy Frugal Life  shared her family room mini-makeover.  She completely updated this space using just fabric and color.  I hope you will stop by to check out all of the details.
Housepitality Designs enhanced her kitchen island with this gorgeous table she picked up at a sale.  What a clever idea!
FURNITURE TRANSFORMATIONS:
Comfortably Carried Away transformed these nesting tables to make them more Parisian.  
C'est magnifique!
A Vintage Green completely updated a drop front desk using paint. 
It's amazing the power of paint.

CRAFTY CREATIONS:
 Life on Lakeshore Drive  gives an awesome tutorial on how to create a burlap candy cane wreath.  Perfect for the holidays.
My Crazy Beautiful Life gives an awesome tutorial on how to create this wreath.  
I want to make a new Christmas wreath.

TASTY TREATS:
Mostly Food and Crafts shares a recipe for cheesy spinach and artichoke dip.  What a great appetizer for any holiday party.
Crafty Journal shared a recipe for super easy pocket pies made using flour tortillas.  So simple and so tasty looking.  Yummy!

If you were featured, please grab an "I've Been Featured" button (you can now find my buttons by clicking on the buttons tab right under my header).  Now let's get started with this week's party.  I can't wait to see what you have been up to.  Link up anything you have been working on...home decor, sewing, crafts, organizing, baking, recipes etc.   I will keep this link open through Friday.


A few rules:
1.  Please become a follower (if you already follow me on Google, I would love for you to follow me on Linky Followers, Facebook, Twitter and Pinterest as well).  

2.  Please grab my party button above and display it either on your sidebar or somewhere in your post.  This way word can spread about the party.  The more people at the party, the more fun we will have.

3.  Please enter the link to your actual post, not just a link to your main blog page.

4. Please visit others who have linked up.   Everyone works hard on their projects and blogs...let's show each other some love by visiting each other.  Let's have some fun and hopefully make a few new friends along the way.

Ok...Let's Party

-Judy

Tuesday, November 27, 2012

End Table Makeover

Well, technically it's a media cabinet, but we have always used it as an end table.
This end table was from my husband's Grandmother home.  

It was in rough shape when we got it.  It was right before I started blogging - literally (and I shared the makeover of everything we inherited in my fifth post - yes my actual fifth post ever).  I had just finished completely stripping and sanding down a big dresser that we also inherited which took me a full day to sand.  I remember hand sanding the top of this and anywhere on it that needed it and then just adding stain to the damaged areas. 
Here is a closeup of the top (after the first time I fixed it up).  It has bothered me for a while now that is was such a blotchy finish. I think I had just run out of steam after working on the big dresser.  The idea of sanding down another entire piece made me a little sick at the time.  Lol
 I decided to give this piece a new life this past weekend.
I ordered myself a new color (well, new to me) of chalk paint - Louis Blue.
I am in the process of infusing some color into our finished basement.  
These are the drapes I made for my basement. 
 I found my color inspiration for this furniture directly from the fabric.  
This time I completely sanded the top using an electric hand sander.
I painted the outside Louis Blue and the inside Old White.
I wasn't taking any chances this time and used a pre-stain wood conditioner on the top before staining.
I love how beautiful the top looks now.  I stained it in a combination of pecan and mahogany - which is what I had in the house already (only a touch of mahogany to make it a bit darker).
The hardware is the same, although it looks ten times better now that you can actually see it.

I used a little Paris Gray to bring out the details and then used a clear wax followed by a dark wax.

I am in love with this now.  The transformation was so dramatic that my husband and kids couldn't figure out where this piece of furniture was in the house prior to the transformation.  It was so dark and blah they never even noticed it.  

It looks so good that I decided it works even better on the other side of the room.


I can't wait to hear what you think!!

Here's another look at the before and after.

Don't forget to stop back tonight for my Fall into Fall party.

The link opens at 8pm EST.  
Hope to see you then.


-Judy
Pin It


Sharing with Savvy Southern Style
Related Posts Plugin for WordPress, Blogger...